Monday, September 2, 2013

Vellum and snowflakes

So, a friend and I have been working on some
fun Christmas projects for an upcoming meeting
this Saturday.  We saw something similar to these
on the internet and made some of our own.
Aren't they pretty? 
We just made a bag out of vellum.  (I don't remember
what the measurements were)
Then we stamped some snowflakes from the
new snowflake stamp set and cut them out
with the matching framelits.  We cut some
out of silver glitter paper and
put them on the front with dimensionals
and they look great.
 
 We made a set of 3.  They look great with little
tealights inside all lit up.
I think I'm going to put these on my wall as you walk up to my front door
this Christmas.  It will look great.
 
Thanks for peeking in today.
Have a wonderful Labor Day.

Wednesday, August 28, 2013

Cutest Fall Centerpiece ever

 
Isn't this just the cutest fall centerpiece you've seen?  I just love it.
 
My convention buddy, and Stampin Up BFF Chris, came over on
Saturday and we worked ALL day on fun Christmas stuff
for an upcoming meeting. 
She left her new Bow Die at my house and I just had
to put it to some good use.
This adorable centerpiece is made using the bow die.
I know can you believe it?
If you hop on over to Create with Connie and Mary blog
(link is on my sidebar) you will find the tutorial to this
adorable pumpkin centerpiece.  So while my family all
took naps on Sunday afternoon, I played with paper.
It is really so much cuter in real life.
Go check it out.  And maybe make one for your table
this fall.  If you need the bow die, or the sweater weather DSP I used, feel free to click on my 
"want to order at home in your jammies?" link and add it to your
basket.
 
Thanks for peeking in today.

Thursday, August 22, 2013

Birthday cards

 
My "28th" birthday came around again last month, and my
dear sweet friend gave me this beautiful card.
I love the field flowers stamp set, so needless to say,
I loved this card.
 She even decorated the inside and the outside of the
envelope with the stamp.  So cute. 
To make things even better.....She didn't leave the message
written on the inside of the card, she wrote it on a
separate piece of paper and just slipped it into the card
so I can use the card as a sample, or a birthday
card myself.  Love this idea. 
I will have to share my other beautiful cards I got
from my club girls in my next post. 
I just love my club girls.
 
Have a great day and thanks for peeking in today.

Tuesday, August 20, 2013

Awesome thanks

 
I mentioned in the last post that at my last workshop Jannis
requested that we make a simple card.  I saw a card very similar
to this one on Patty Bennett's blog and loved it.
I had to change the colors because I didn't have the red
chevron ribbon.  
This card uses that super fun stamp set Yippee Skippee. 
The border on the bottom comes from Gorgeous Grunge.
Two stamp sets we got free at Convention.  Yay for free.
I used the chalk talk framelits to cut out the tag used for the
sentiment.  I love how versatile that framelit pack is.
They can be used for some great tags and with
Christmas coming up, I think everyone needs that toy.
 
 
Thanks for peeking in today.
Have a great day.

Monday, August 19, 2013

Washi Thank you

 
 Happy Monday. 
 
I had a fun Stampin Up workshop last week with a friend and some of her friends. 
 
I wanted to share with you the fun Thank you card I made for the ladies.
My friend Jannis said to keep the card we made at the workshop
simple.  (I will share the card we made in another blog post)
So, I thought I would keep the thank you card simple as well.
 It uses the washi tape from the This n That collection. 
I think the washi tape is lots of fun to use and love
how forgiving it is.  If you put it in the wrong spot
and need to lift it up to reapply it, it doesn't rip the paper.
I love that. 
I wanted to give the inside a little love too, so I just
added a couple strips of washi tape to mimic the front
of the card.  Easy Peasy!!
 
 
Well thanks for peeking in today. 
I hope to be able to get on here more often
and post more of the fun things we make in club.
 
Have a great day!!!

Wednesday, August 14, 2013

Single Stamps available once again


Can you believe it?  I am actually blogging again.  It has been a long time since I've blogged and I almost forgot how to post on here. 
I was excited about these holiday single stamps and wanted to share with you. 


Be looking for more posts here soon. 
Thanks for peeking in today.

Monday, April 9, 2012

Ghiradelli Chocolate Treat holder revisited

Okay, so this month at club Toni wants to make these cute little Ghiradelli chocolate treat holders.
You can see the original post, and the tutorial on how to make them here
I just love the new Summer Smooches stuff that we can order in the month of April, so I decided to use those for our treats this month.
This is a side view.  I used some retired gold cord to tie it together.  You could easily use some of the 1/8" taffeta ribbon instead.
Here is a sneaky peeky into the middle. 
These really are a fun way to give a little treat to someone.
Of course, just handing me chocolate makes me happy whether it's in a cute pacakage or not.....{{big cheesy grin}}}

This is a blurry picture of my 7 grandchildren that we tried to get after the Easter Egg hunt on Sunday.  It's getting harder to capture them all together at once now that there are more of them, and so young.  So, I'll take blurry over nothing at all.

Thanks for peeking in today.

Saturday, April 7, 2012

Hear comes Peter Cottontail....

If anyone has been following my blog long enough, you might recognize these cute little bunny bums from last year. 
I just think this is such a cute card that I had to make one for my club girls.
 Unfortunately, it uses the retired small oval punch for the bottom of his feet.  I guess if you didn't have that punch you could wing it somehow.  Sidenote: one of my club girls was telling me that she has been looking for that small oval punch on ebay.  She found one that went for $75.00!!!  Wow!!!  That's just crazy to me.....she did find one for much cheaper than that, but my mind still spins that someone would spend that much for a punch.  But, I wouldn't sell my punch....not even for $75.00, so I guess that says how much I value mine huh????
 I used the Trendy Trees stamp set for the carrots in Pumpkin Pie and Lucky Limeade, and Teeny Tiny Wishes for the Happy Easter.  For the body I used the 1 3/4" circle punch, for the head I used the 1 1/4" circle punch, the tail uses the 1/2" circle punch and then the oval punches for the ears and feet.  I used the 1/8" punch for the little toes on his feet.
Then, I had to let my girls know how much I LOVE being their Stampin Up demonstrator, so I stamped it in the middle, added a few carrots and off in the mail they went.
If anyone really knows me, they know it was "shocking" that I made the cards and got them in the mail on the same day.  I just don't do the post office really well.  I'm really good at making cards, but HORRIBLE at sending them.  So, I was a little proud of myself that I was able to get those in the mail.  So silly I know.

If you are one of my club girls, and you haven't gotten your card in the mail yet, well now you know to be looking for it.  {{{big cheesy girn}}}

Thanks for peeking in today.
I need to go clean my house.....yuck!!!  Where's that darn fairy godmother when you need her?????

See ya.

Thursday, April 5, 2012

A Pinwheel baby shower

Last weekend I threw a baby shower for a friend who is having a little boy here soon.  I didn't want to do the typical little boy colors and theme.  I thought pinwheels would make a cute little boy shower, and I think they did.  I used the DSP Big Top Birthday and the stamp set Sweets for the sweet for the cupcake toppers.
I made 30 #2 boxes and wrapped some DSP around them and added a pinwheel on top for the party favors and filled them with chocolate of course....
Then I made a really cute banner that hung in the living room as you walked in.  The bottom picture is just one of the pinwheels, but I had enough made to spell out "Welcome Baby Nicholas"  They were really cute and she took them home after the shower to hang in the nursery. 
I didn't get a good picture of the banner because I didn't think about taking pictures until people were already here.
So, I've been a busy girl and it has been so much fun making everything.
Thanks for peeking in today.

Have a great day.  

Tuesday, April 3, 2012

Embossed tulips with a twist tutorial

I have had a few requests for the directions on how I made a card similar to this one.  I have had trouble with uploading these pictures and so they are somewhat out of order.....just ignore that {{big grin}}
So, this is what the card looks like after it's been run through the Big Shot and before I added the punched flower.  Below I show you the details of how it was done.
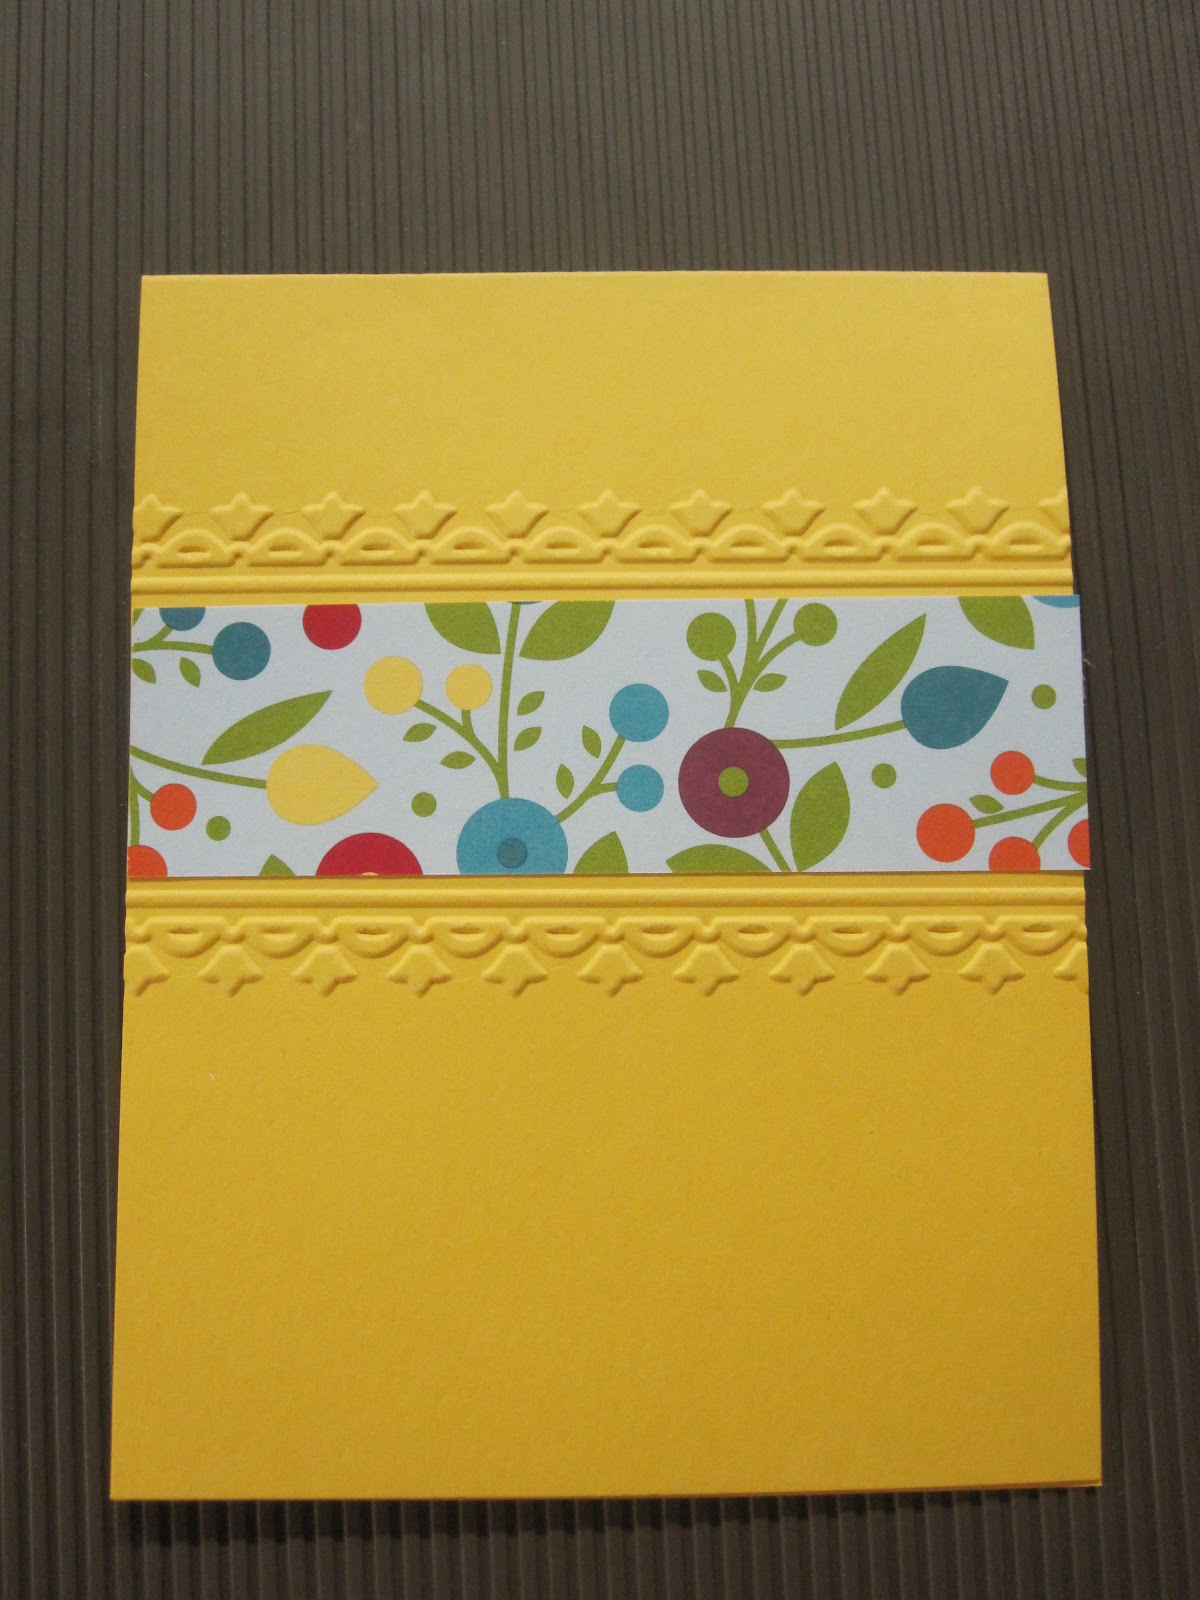
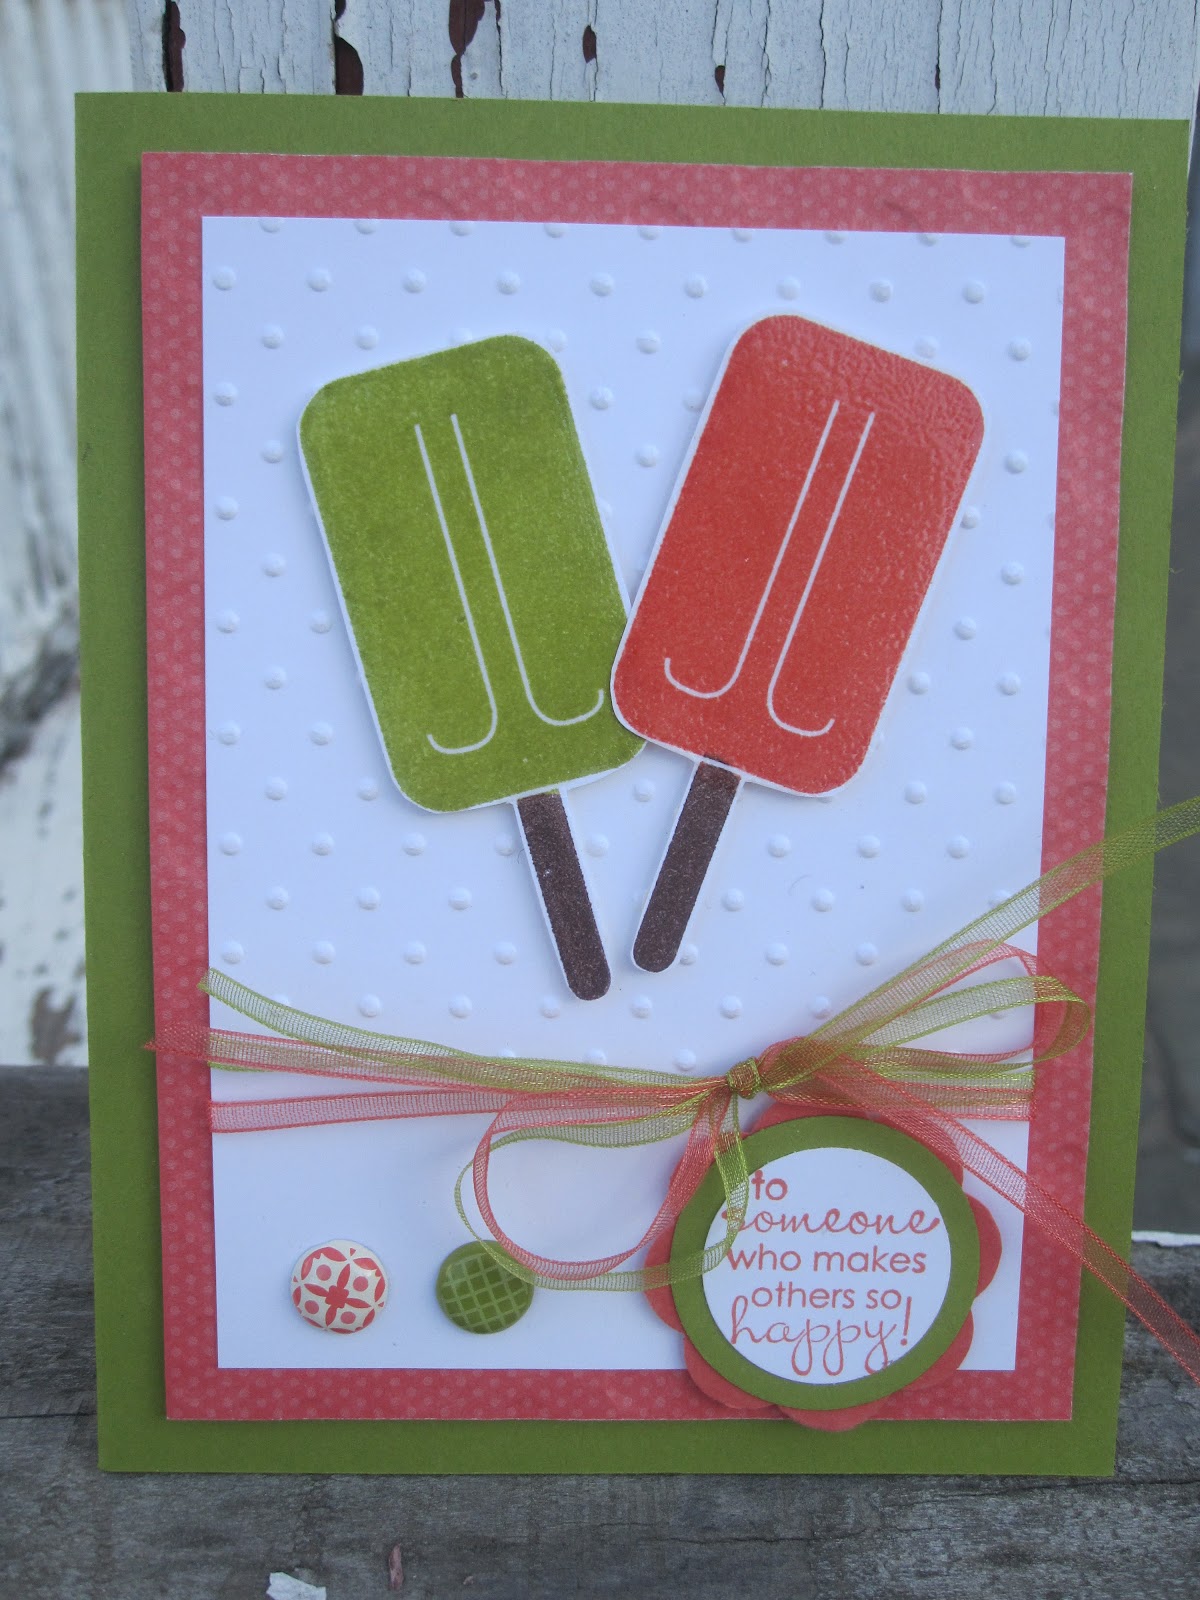
 Here is the card with the Blossom punch added.  I left a sentiment off so I can add it when needed.  I just love this new Summer Smooches DSP.  It really is a happy pack of paper!!!!  I also used one of the fabric brads for the middle of the flower.  I love those too.
 Now, onto the details. 
You cut your paper 11"x4 1/4" and then score it in the middle at 5 1/2".
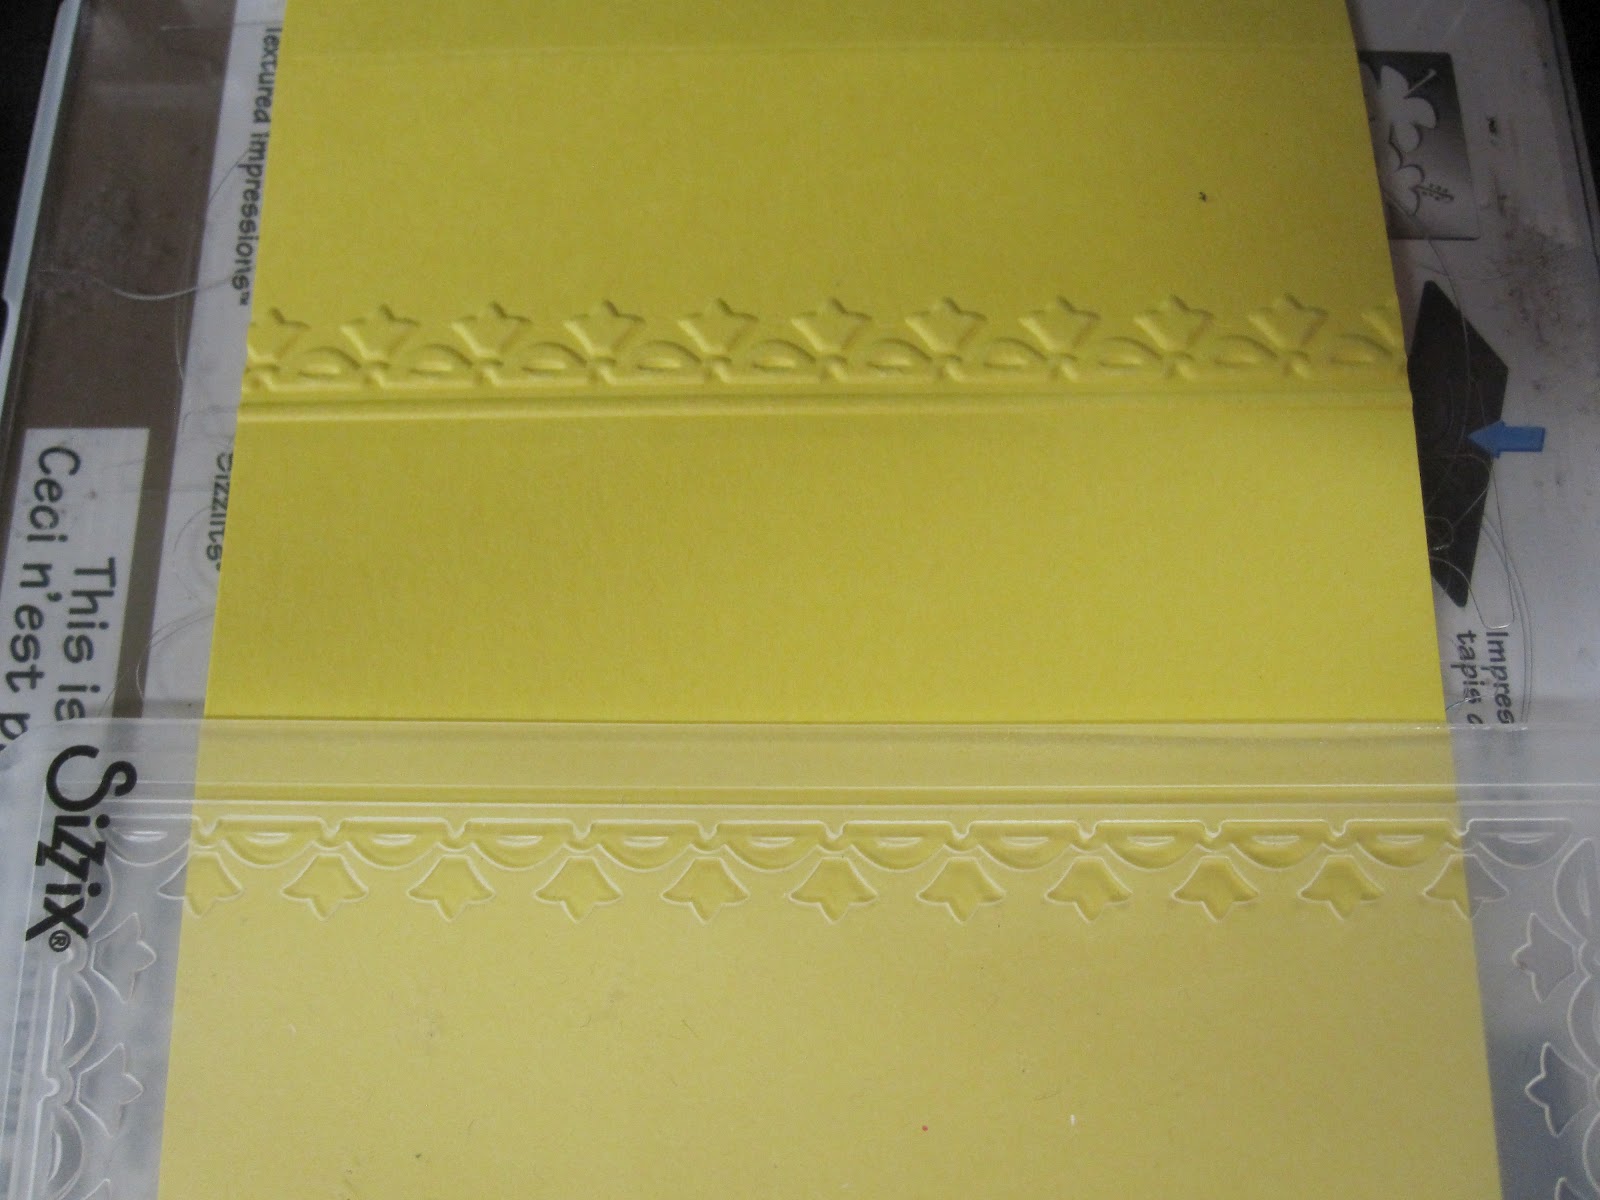
 Hopefully these pictures will explain things better.  I'm not a tutorial queen by any means, so bear with me here.  You'll notice I have the framed tulips folder so only two sides are actually on the paper.  I don't think you can see it very well from the picture, but the score line is hidden in the embossing folder.  I wanted the tulips to be standing up on the top part of the embossing, so I made sure that the tulips were "UP".  It woud be the bottom part of the embossing folder from the picture below.
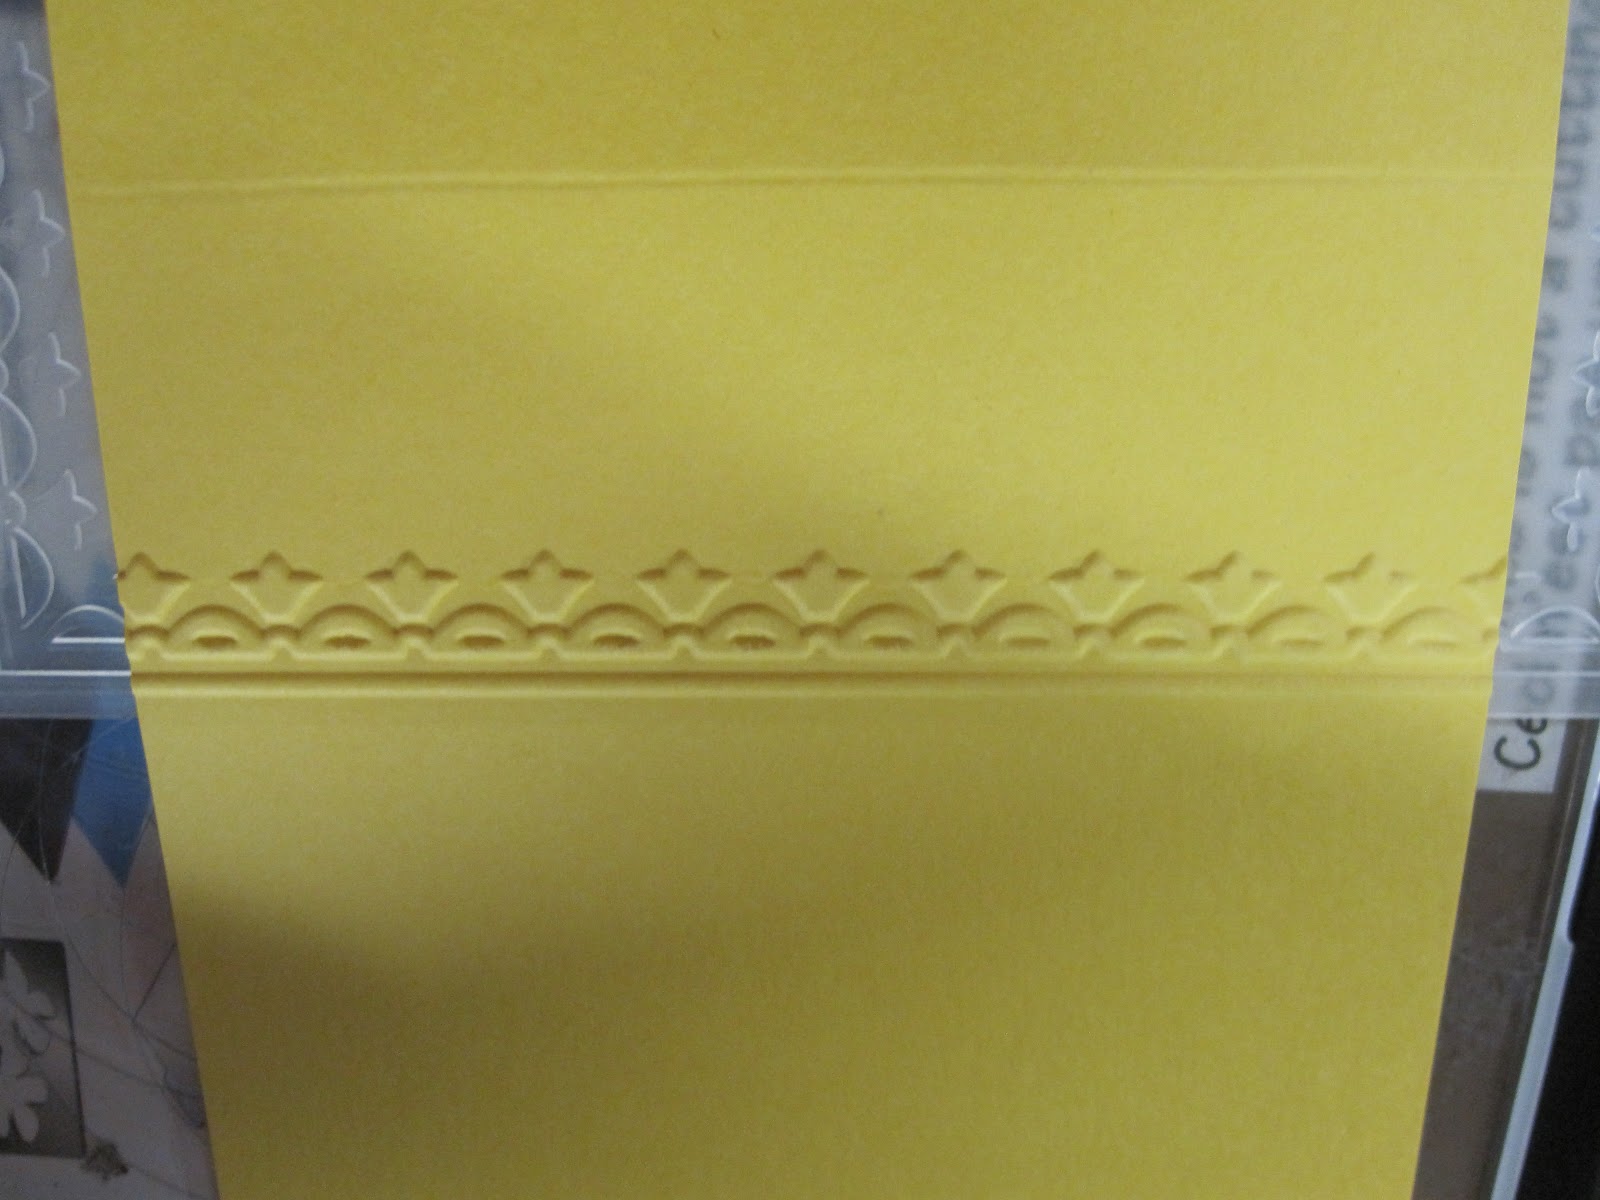
 Hopefully this close up helps you see it a little bit better.  You can actually see the score line in this picture, so you get an idea of where the paper is in the embossing folder.
 Then, run it through the Big Shot, BUT....make sure that the top part of your card is what is going through the Big Shot first.  Otherwise, you will emboss the tulips that are along the back side of the card, and you don't want to do that.  After I run the embossing folder where the tulips are on the front of the card.....then I BACK IT OUT.  Don't run the whole embossing folder through the Big Shot.  Only the front half of the card.
 Hopefully this picture helps . 
 After running it through and then backing it out, this is what the front of your card looks like now.
 Now, flip the embossing folder around.  This way the tulips will be facing down.  It just gives your little area a nice frame.  Then, you will run it though the Big Shot the same way as above.  You run it through and then back it out.  Don't go all the way through the Big Shot with your embossing folder.
 When you are finished, this is what it should look like. 
I made a few mistakes the first few times I did this trying to figure it out, so don't be discouraged if you have to try a few times to get it right. 
When you are done, you just decorate your front however suits your fancy. 
You can make your empty space as far apart as you want for whatever you choose to do to the front of your card.

I sure do hope this wasn't too confusing and helped explain a few things. 
Once you get the hang of it, it whips together really quickly.

Now go try it yourself and see how you do.

Thanks for peeking in and have a wonderful day.

Sunday, March 25, 2012

Embossed Framelits

How fun to make this card.  I had cut out this white label from the framelits die and it then just sat on my desk.  I wasn't sure what to do with it.  Then, I realized that the oval designer embossing folder fit it percfectly, I then knew what I wanted to do.  Ironically enough I had everything on this card cut and just sitting on my desk, and I had to figure out how to put it together.  So, I guess you could say it was a scrap card. 
Now if can just figure out what to do with all the other scraps on my desk.   hahahahaha

Thanks for peeking in.

See you again soon.

Friday, March 23, 2012

Framed Tulips with a twist

I saw this card out there in blogland, and loved the twist using the framed tulips embossing folder. 
In order to do this technique you have to have the card cut 11" x 4 1/4" and folded in half, with the fold at the top.  That way you can get just one side of the folder to emboss.
And then of course, I had to use that wonderful punch Blossom.  I love it!!!
This was a fun card to make, and simple.  I love that combination.

Thanks for peeking in today.
And where has March gone?  I can't believe it's almost over already.  Wow!!!

Make it a great day today.

Wednesday, March 21, 2012

Sympathy and Prayers

Sadly I had to make another sympathy card for a friend.  A really good friend of mine's husband passed away last week.  So, this is the card I made for her.  I had made these flowers from the Vintage Vogue stamp set a couple years ago.  I had them cut out and everything, but had still not used them. 
I saw a card very similar to this one somewhere out there in blogland or pinterest, one of the two.  So, since I already had the flowers stamped and cut out, I used them to replicate this card.
I really like this card, and think it could be used for lots of different occasions, just change out the sentiment.  I haven't used Regal Rose in what seems like forever, so it was fun to bust it out.

Thanks for peeking in today.
Make it a wonderful day!!!

Monday, March 19, 2012

Loving the quilted look

The last card that Christine wanted to make at club was a quilted card.  So, I busted out the postage stamp punch, punched out 12 squares from the wonderful Everyday Enchantment paper from the sale a bration catalog.  I have to admit that I've stocked up on that paper.  I LOVE it.
They line up very nicely, then we ran it through the lattice embossing folder and it's magical how it makes it look quilted. 
And of course when you make a quilt, to me, buttons go with it, so I threw on a button with a little ribbon.
 That Poppy Parade envelope was made using that new diagonal plate for the simply scored.  They make up sooooooo easily.  I love how now you can make a matching envelope for your card in no time flat.
 Here was another envelope I made using some retired DSP.  I love how you have a fun envelope for your cute card, and then the inside is all decorated already too.
I totally recommend you get the diagonal plate if you don't have it yet.  It is soooooo worth the $11.95 that it costs.
So those are the fun things we made at club last Monday.

Thanks for peeking in today.
Make it a wonderful day today.

Thursday, March 15, 2012

Mouthwatering

At club Monday night, my hostess, Christine wanted to play with the new stamp set Mounthwatering and the new scented embossing powders.  So we did. 
I gave the ladies the option of making one of the two cards. 
I have to say that that scented embossing powder really does smell amazing. 
The minute you take the lid off you smell it and your mouth does water. 
Tomorrow I will show you the other card we made with the Send me Soaring stamp set.

Thanks for peeking in.
Have a wonderful day.

Wednesday, March 14, 2012

Mixed Bunch

I can't believe that it has almost been a month since my last blog post.  Where does the time go? 
I have been having fun in my craft room playing with all kinds of fun new stamps. 
The one stamp set and punch that is my favorite right now is Mixed Bunch and the new Blossom punch.  I sure do hope these make the new catalog coming out in June.
Here are 2 cards I have had fun making. 
 These cards both made up pretty fast once I decided what to do.  I do have to say that I am NOT happy with my leaves on this card.  I think they need a softer more rounded leaf.  Oh well.
I also used the Elementary Elegance stamp set from the sale a bration catalog for the sentiment.  I really like the font for this Hello.
So one of the reasons it has taken me so long to blog is because it was such a pain to upload pictures to my computer.  The way I used to use wasn't working and it made it a long process to get the pictures to the computer.  I got lazy and just forgot to blog.  Well, I had a friend tell me she was missing my blog posts, so I thought I would give it another try.....and yippee hooray.....it was working.  So, I have a lot of cards and fun envelopes that I've made with the new Simply Scored diagonal plate that I have uploaded and just need to get posted. 
So, just maybe I will have another blog post here soon.

Thanks for peeking in today.

Saturday, February 18, 2012

More Field Flowers

I just love the color Night of Navy.  I don't use nearly enough.
Since I went on a Field Flowers kick, I decided to use some Night of Navy with it.
I like the simplicity of this card.  I think because the bow is not to thick, it would even make it through the mail with a normal stamp.  Who knows. 

At our last club meeting 2 of the girls brought some cards they had made for show and tell, and 2 of the girls brought us little gifts.  I will do my best to get those to upload and share with you. 
I'm so proud of these ladies.  I really do love club!  These women have become such wonderful friends.
I miss the few who had to take a sabbatical, and hope they rejoin us again real soon.

See you again soon.
Thanks for stopping by today.

P.S.  I don't know if you noticed the new bar on the side to follow me on pinterest or not.  I have to tell you that Pinterest is my new addiction.  There are so many great ideas and recipes on there.  If you don't know what it is yet, click on there and ask me for an invite and I will invite you to join.  It's given me the motivation to do fun things to my house again, and make new recipes.  If you haven't tried it yet, you gotta.  {{{{big cheesy grin}}}}

Sunday, February 12, 2012

Just be happy

I'm so frustrated with blogger right now, that I need to take my own advice and "just be happy". 
I have been struggling uploading pictures to my blog the last few days.  When it takes more than 10 minutes for a picture to upload.....I get frustrated.  Oh well.  Upward and onward.
This is one of the cards that I made for my stash.  I saw someone else made a card similar to this and I loved how they used the two stamp sets together. People are so creative!!!  I don't know who to give credit too, but if you do....let me know and we will give them credit.
For this card I used Marina Mist and Poppy Parade.

Thanks for peeking in.
Have a wonderful day.

Friday, February 10, 2012

Happiest thoughts

I have been seeing lots of cute cards made using the Field Flowers stamp set, and so I just had to get it. 
I have been playing the last few days with it too.
I have also been thinking that with all the new changes to Stampin Up and the new catalog coming out in June instead of July, that I really need to use up last years In Colors.
This card uses Poppy Parade (which I will really miss when it goes away) and Pear Pizazz.
I also noticed that one of the rhinestones fell off of one of the flowers in the upper left hand corner....oops.

I have a few more cards that I have made using this stamp set that I will be sharing in the next few days as well.

Thanks for peeking in.
Have a wonderful day.

Monday, February 6, 2012

Birthday thank you cards....

These are what the cards I made for my club girls this month for their thank yous look like.
Boy, that was confusing wasn't it?
I figured why not make some more cards for my stash while I was making their cards too.  So, I made 4 of these for me as well.
 I ran out of white ribbon, so I just used red ribbon on the rest of the packages for my cards.
These were some fun, yet easy, cards to make.

Thanks for peeking in today.
I hope your day is wonderful.